Get your containers to show up on your router (MacVLAN networks)
This time we are focusing on Docker MacVLAN networks, to get our containers to show up on our router.
Introduction
Previously we talked about Bridge networks in this article. This time we are focusing on MacVLAN networks. This is an interesting network type, because we can get our containers to individually show up on our router.
A word from a friend
Want to stay up to date on the latest news and technologies in the cybersecurity industry? You can read about it right now on Cyber Oracle: www.cyber-oracle.com
MacVLAN networks
Benefits of MacVLAN network
When we have containers running, connected to a MacVLAN network, they get their own IP-address and MAC-address. This makes the containers appear as physical devices on the network, and we can see them individually on our router software, and monitor their network behaviour.
How to create MacVLAN network
To create a MacVLAN type network, we need to give the driver parameter, along with subnet and optional gateway parameter for the create command. If we don’t give the gateway, Docker will use the first IP address as the gateway from the given subnet. We also need to give the network interface to use from the host. In this example, we are using Ubuntu, and the host network interface is called enp0s3. We enter that with the option parent. In this example, our host is in subnet 192.168.1.0/24, so we will create the network on the same subnet. Here’s the full command:
docker network create --driver macvlan --subnet=192.168.1.0/24 --gateway=192.168.1.1 -o parent=enp0s3 vlanThere, we have our MacVLAN network created.
Join container to the network
To make your containers join the network you want, we need to provide the network parameter to docker run command, like this:
docker run -dit --name alpine1 --network vlan alpine:latestHere we run a Alpine Linux container with the network parameter to join our vlan network. Also notice -dit parameters: d for daemon, i for interactive, and t for tty. These parameters makes the container run in the background, and allow us to attach to its shell at a later time.
Now if you inspect the container:
docker inspect alpine1You will see, that it has an IP-address from the same subnet as your host is in. The container even has its own MAC-address, since we used driver macvlan.
"Networks": {
    "vlan": {
        "IPAMConfig": null,
        "Links": null,
        "Aliases": [
            "d685b3d90d2f"
        ],
        "NetworkID": "b4b11e007f0a8c0fb9...",
        "EndpointID": "7ff281577c561a648...",
        "Gateway": "192.168.1.1",
        "IPAddress": "192.168.1.2",
        "IPPrefixLen": 24,
        "IPv6Gateway": "",
        "GlobalIPv6Address": "",
        "GlobalIPv6PrefixLen": 0,
        "MacAddress": "02:42:c0:a8:01:02",
        "DriverOpts": null
    }
}
Notice that at least currently Docker cannot utilize DHCP to assign IP-address to our container. If we don’t give the IP-address ourselves, Docker will auto assign the first IP-address, that Docker thinks is free for the subnet. If you run multiple containers, they get their own IP-addresses, because Docker knows what IP-addresses have been already given to containers. But again, you have to somehow make sure the container IP-addresses don’t overlap with assigned DHCP addresses in your network. You can do this for example with --ip-range parameter, when creating the network.
Testing the network
Let’s attach to the container, and test that our network works. Attaching is done like this:
docker attach alpine1Then we will try to ping our gateway from the container, to see if the network is working as intended:
/ # ping 192.168.1.1
PING 192.168.1.1 (192.168.1.1): 56 data bytes
^C
--- 192.168.1.1 ping statistics ---
2 packets transmitted, 0 packets received, 100% packet loss
We notice that the ping is not going through! Something is wrong here.
Promiscuous mode needs to be enabled
The problem is, that now two MAC addresses are communicating from one ethernet port to the router: Our actual host and the container. By default, this is not allowed. There is a way to allow this though: We need to enable promiscuous mode on our network interface.
On Ubuntu, this can be done like this:
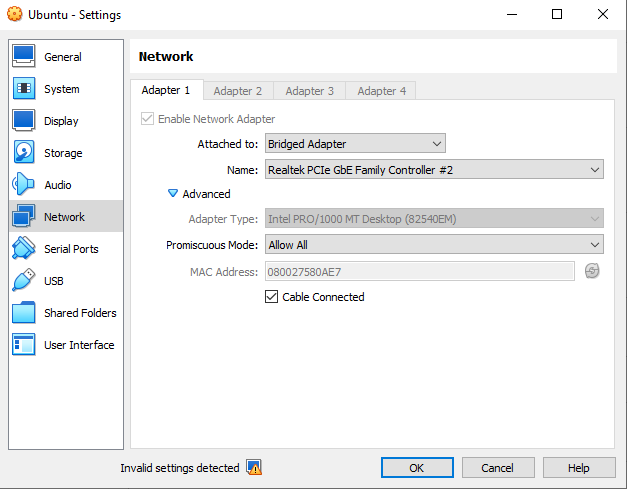
sudo ip link set enp0s3 promisc onNotice that if we are on a virtual machine, we probably need to enable promiscuous mode from its settings too. On VirtualBox this is done by navigating to the VM’s network settings. Open Advanced settings, and set Allow All to Promiscuous Mode.
Let’s try pinging the gateway again:
/ # ping 192.168.1.1
PING 192.168.1.1 (192.168.1.1): 56 data bytes
64 bytes from 192.168.1.1: seq=0 ttl=64 time=1.900 ms
64 bytes from 192.168.1.1: seq=1 ttl=64 time=0.814 ms
^C
--- 192.168.1.1 ping statistics ---
2 packets transmitted, 2 packets received, 0% packet loss
It works!
Now go check you router, and you will see that the container is visible there with its own IP-address, and you can monitor its traffic as it would be a physical computer.
A note about Docker on Windows
I could not get MacVLAN networks to work in promiscuous mode on Docker on Windows. It could possibly be an issue with WSL2, but I’m not really sure. Just be aware of that.
Happy coding!


