The setup
Previously we discussed the project idea and its requirements. You can read about these in the first part of this article series here: Let's build a website.
This time we’ll take a look at how we will set up our backend project.
We’ll basically have two separate projects: the backend, and the frontend. These can be developed separately, since there is an API between them. As long as both, backend and frontend, implement the same API, they will work together. Of course it is easier to develop them together, because then we can immediately see if we need to make any changes to the API.
But this time we will focus on the backend. Note that the articles are written so that development happens on Windows 11. The examples should work on a Linux or Mac machine as well, but there will be Windows specific instructions, such as setting path settings.
Installations
Let’s install the tools we need to start building the backend:
Install Java Development Kit (JDK) 17 or newer
Install IntelliJ Idea Community Edition (or Ultimate if you have access to it)
Project setup in IntelliJ IDEA
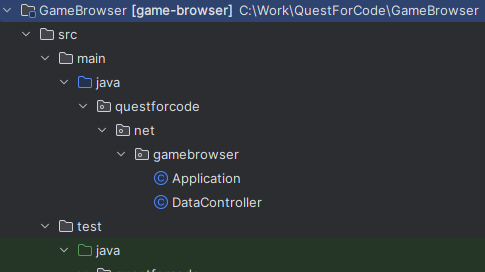
We’ll have the following kind of folder structure for the backend:
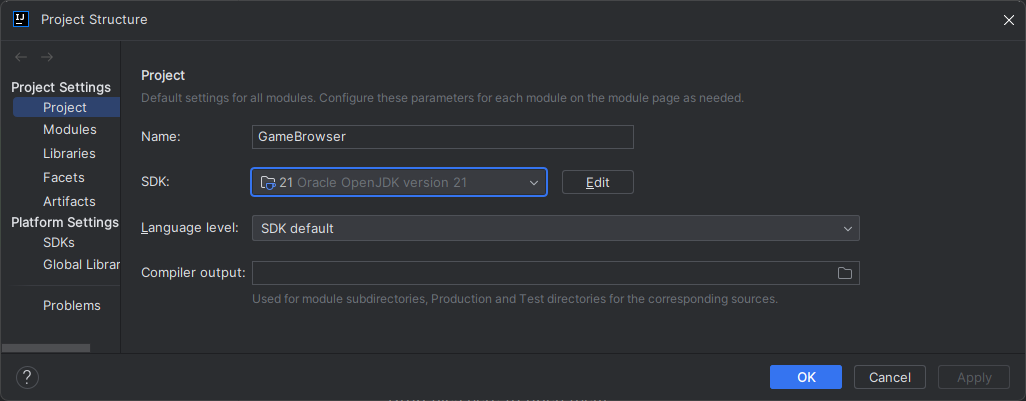
Create the same kind of structure for your project, and then open it in IntelliJ. Once you’ve opened it, we need to make sure we’ve got the correct JDK for the project. Press thee Three lines menu and then look at Project structure - Project - SDK. IntelliJ should have recognized your installed Java version. Select your installed JDK, and press OK.
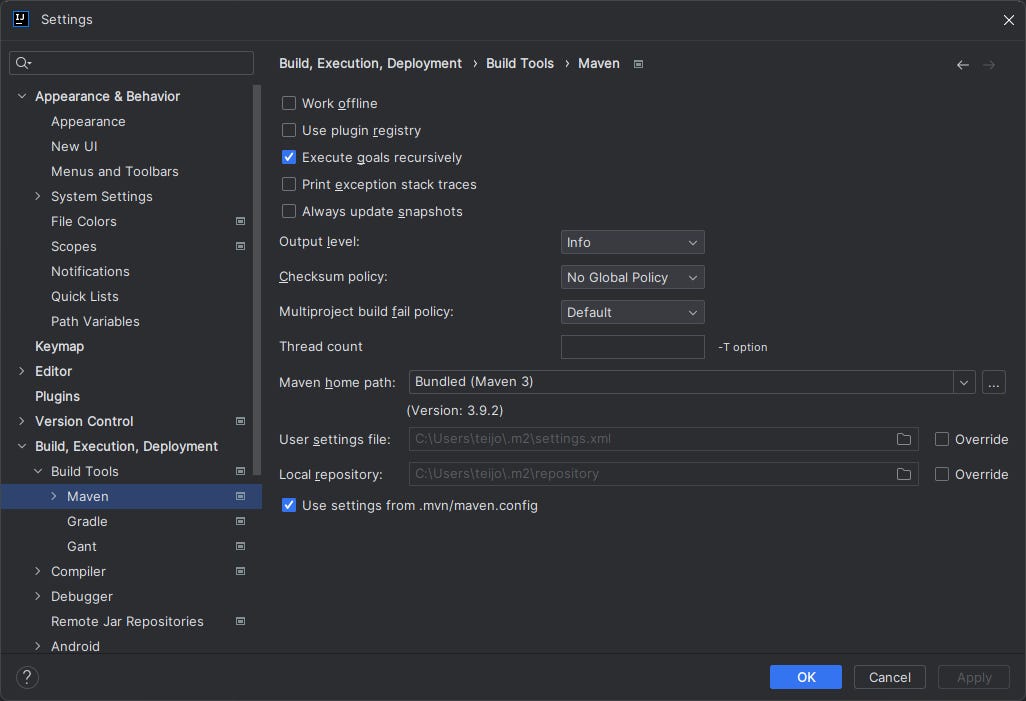
The other thing we should check is Maven settings. Press the Three lines menu again, and go to Build, Execution, Deployment - Build Tools - Maven. Check Maven home path on the right side of the window. We can use the bundled Maven, or we could use a separately installed Maven if we want to. Leave it to Bundled (Maven 3) for now.
It is a good idea to have Maven available from command line as well, so add the Bundled Maven to path. My IntelliJ version is 2023.2.2, so my path to Maven is:
C:\Program Files\JetBrains\IntelliJ IDEA Community Edition 2023.2.2\plugins\maven\lib\maven3\binAdd this, or similar directory to your environment’s Path settings, and re-open your command line. Now running ‘mvn --version’ should print version of Maven.
Using the bundled Maven is not optimal, since this path changes when IntelliJ is updated. Also the version of Maven might change. So if you prefer to use your own installation of Maven, it is simple to do so. Just install it, change the Maven home path for your project, as described above, and set its bin directory to your environment’s Path.
The source code
The source code is divided into application code and test code. Application code implements the program, and test code is used to test that the application’s portions work as intended. These are called unit tests (since they test single units of the application, such as a class).
Maven dependencies
pom.xml:
<?xml version="1.0" encoding="UTF-8"?>
<project xmlns="http://maven.apache.org/POM/4.0.0" xmlns:xsi="http://www.w3.org/2001/XMLSchema-instance"
	xsi:schemaLocation="http://maven.apache.org/POM/4.0.0 https://maven.apache.org/xsd/maven-4.0.0.xsd">
	<modelVersion>4.0.0</modelVersion>
	<parent>
		<groupId>org.springframework.boot</groupId>
		<artifactId>spring-boot-starter-parent</artifactId>
		<version>3.1.0</version>
		<relativePath/>
	</parent>
	<groupId>net.questforcode</groupId>
	<artifactId>game-browser</artifactId>
	<version>0.0.1-SNAPSHOT</version>
	<name>game-browser</name>
	<description>Quest for Code Game Browser</description>

	<properties>
		<java.version>17</java.version>
	</properties>

	<dependencies>
		<dependency>
			<groupId>org.springframework.boot</groupId>
			<artifactId>spring-boot-starter-web</artifactId>
		</dependency>

		<dependency>
			<groupId>org.springframework.boot</groupId>
			<artifactId>spring-boot-starter-actuator</artifactId>
		</dependency>

		<dependency>
			<groupId>org.springframework.boot</groupId>
			<artifactId>spring-boot-starter-test</artifactId>
			<scope>test</scope>
		</dependency>
	</dependencies>

	<build>
		<plugins>
			<plugin>
				<groupId>org.springframework.boot</groupId>
				<artifactId>spring-boot-maven-plugin</artifactId>
			</plugin>
		</plugins>
	</build>
</project>
This file configures the basic meta data for our application, and what Maven packages we use to build our application. That is the <dependencies> part.
Application
Application.java:
package questforcode.net.gamebrowser;

import org.springframework.boot.SpringApplication;
import org.springframework.boot.autoconfigure.SpringBootApplication;

@SpringBootApplication
public class Application {
	public static void main(String[] args) {
		SpringApplication.run(Application.class, args);
	}
}
Here we have the main function of the application. Nothing interesting here, just normal Spring Boot boilerplate code.
DataController.java:
package questforcode.net.gamebrowser;

import org.springframework.web.bind.annotation.GetMapping;
import org.springframework.web.bind.annotation.RestController;

@RestController
public class DataController {
	@GetMapping("/")
	public String index() {
		return "Quest for Code Greets you from DataController!";
	}
}
This is the controller for the data requests. Controller defines the API for the frontend to query data from the backend. For now, it only returns a greeting, when you do a GET request to the root (“/”).
Tests
DataControllerTest.java:
package questforcode.net.gamebrowser;

import static org.hamcrest.Matchers.equalTo;
import static org.springframework.test.web.servlet.result.MockMvcResultMatchers.content;
import static org.springframework.test.web.servlet.result.MockMvcResultMatchers.status;

import org.junit.jupiter.api.Test;

import org.springframework.beans.factory.annotation.Autowired;
import org.springframework.boot.test.autoconfigure.web.servlet.AutoConfigureMockMvc;
import org.springframework.boot.test.context.SpringBootTest;
import org.springframework.http.MediaType;
import org.springframework.test.web.servlet.MockMvc;
import org.springframework.test.web.servlet.request.MockMvcRequestBuilders;

@SpringBootTest
@AutoConfigureMockMvc
public class DataControllerTest {
	@Autowired
	private MockMvc mvc;

	@Test
	public void getHello() throws Exception {
		mvc.perform(MockMvcRequestBuilders.get("/").accept(MediaType.APPLICATION_JSON))
    .andExpect(status().isOk())
    .andExpect(content().string(equalTo("Quest for Code Greets you from DataController!")));
	}
}
Run the application
Go to your command line, where you have Maven in Path, and change to your project’s directory. In the screenshots above, you can see that in my case the project is located at:
C:\Work\QuestForCode\GameBrowserThis is the directory that contains pom.xml. Cd into your respective directory and run:
mvn spring-boot:runMaven will download all dependency packages (defined in pom.xml), and will then start the application. Your command line will not return and the application shutdown, until you press Ctrl+X. But before you do that, open a web browser, and go to localhost:8080.
Game Browser backend is up and running, and returned its first data. Sure it is always the same, hard-coded data, but it is data. Now imagine it returning something meaningful, retrieved from a database somewhere. The principle is the same: the frontend (browser) makes a request to a specific endpoint, and the backend answers. The data should of course be visualized in a better way, but it doesn’t change the way data flows from frontend to backend, and then back to frontend again.
Coming up
Next time well build on this base, and we’ll do some queries from the IGDB and hopefully get the raw data showing up on our browser. We’ll look at endpoints, and how to add them to our backend.


